
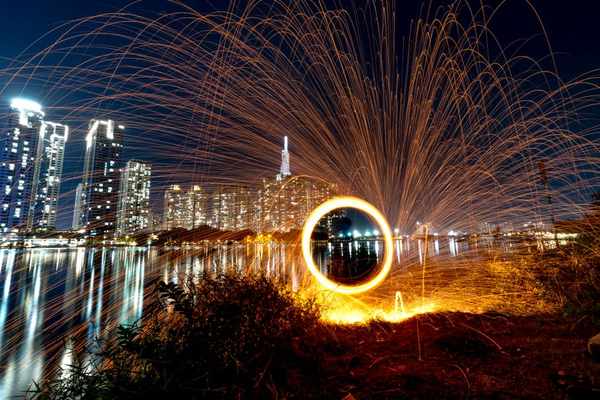
What light painting ideas are easiest to try at home?
The easiest light painting ideas use a dark room, a stable camera, a long exposure, and a small movable light source. Start with simple loops, outlines, spirals, or repeated passes behind a still subject. Keep the camera fixed, control stray light, and rehearse the movement before opening the shutter.
Light painting works best when you treat the room like a controlled set rather than simply switching off the lights. The most useful ideas for light painting are the ones you can repeat, adjust, and frame cleanly without turning the room into a permanent studio. For more practical room-based light ideas, keep the same principle: decide where the light should appear, where it should not, and how much space you need to move safely.
What light sources work best for light painting photos?
Small handheld lights are easiest to control because you can move them through a precise path without lighting the whole room. The best choice is one that can be switched on and off quickly, aimed narrowly, and carried without trailing cords across your route.
Seven setups to try at home
- Single-loop portrait: Put a seated subject in one fixed spot and trace one broad loop behind the shoulders so the trail frames the person instead of crossing the face.
- Doorway outline: Stand just behind an open doorway and trace the inner rectangle in one smooth pass, keeping the light pointed toward the camera only while it moves.
- Furniture edge trace: Outline the top and side edges of a chair or small table while keeping your body behind the furniture as much as possible.
- Spiral behind a still subject: Start near the center of the frame and widen the spiral gradually so the final trail reads as one deliberate shape rather than a tangle.
- Repeated vertical bars: Move the light up and down at evenly spaced positions across the background to create a clean rhythm that is easy to reproduce.
- Ceiling-to-floor sweep: Make one controlled diagonal pass from high to low behind the subject, leaving enough floor clearance to avoid stepping into furniture or tripod legs.
- Hidden-object reveal: Keep the light turned away from the lens while briefly brushing it across one object, then switch it off before you move to the next position.
These are more dependable than complicated light paint ideas with many separate moves. If the first frame is messy, simplify the path before adding another.
Light source choices at a glance
| Light source | Control in a small room | Best use in the frame |
|---|---|---|
| Small flashlight | Narrow beam is easy to aim away from walls | Loops, outlines, and precise paths |
| Phone flashlight | Convenient but harder to grip for long sweeps | Short tests and simple shapes |
| LED wand | Needs more clearance because the lit area is longer | Broad bands and repeated passes |
| String light bundle | Can snag on furniture if the route is tight | Broken, dotted, or clustered trails |
| Small battery lantern | Spreads more light onto nearby surfaces | Soft object illumination rather than thin lines |
How do you set up a dark space for light painting?
Choose the room with the least uncontrolled light, close blinds or curtains, switch off indicator-heavy electronics where practical, and remove reflective clutter near the frame. Leave a clear walking route around the camera because the person making the light trail will be moving in very low visibility.
A 10 x 12 ft room is enough for many seated portraits if the tripod stays near one wall. For a standing full-body setup, 12 x 15 ft gives the light path more useful depth.
- Tripod to seated subject 6 to 8 ft
- Clear path behind subject 3 ft minimum
- Tripod leg clearance 24 in minimum
- Standing subject backdrop width 8 ft minimum
- Full-body working room 12 x 15 ft
If the room must stay usable every day, do not repaint it just for photographs. A practical compromise is Benjamin Moore Pale Oak at #D8CFC4 for the everyday walls, then removable blackout fabric around the shooting area when you need a darker set.
#D8CFC4 · Benjamin Moore Pale Oak
Reads warmer in south-facing light and noticeably grayer in north-facing light. Use it on walls and ceiling, roughly 60 percent of the room, while removable blackout material does the photographic work during the exposure.
That approach suits a rental because you can control spill without fixing panels to the walls. Make one test frame with the light source off; if windows, screens, or door gaps remain visible, block them before adding the trail.
Which camera settings help create clean light trails?
Use manual exposure, a low ISO, a stable tripod, and manual focus so the camera does not hunt in the dark after each frame. A useful starting point is ISO 100, f/8, and a 10-second exposure, then change one setting at a time after checking whether the trail is too faint, too bright, or too short.
For longer light painting ideas, extend shutter time before raising ISO because extra sensitivity also records more room glow. If the trail blows out, reduce its brightness, increase its distance from the lens, or close the aperture.
- Focus before darkening the room: Place the subject or a stand-in where the final subject will be, focus there, then switch the lens to manual focus.
- Use a short delay: A 2-second self-timer helps prevent the small vibration caused by pressing the shutter.
- Check the background: Review the frame edges for glowing screens, power strips, or door gaps that were easy to miss by eye.
- Repeat the same path: If you change the light movement and the exposure at the same time, you will not know which change improved the image.
How can you plan colors and shapes before starting the exposure?
Plan the shape first, then decide how many light passes the exposure can hold. Sketch the movement, mark its start and finish points, and keep each path simple enough to repeat.
For light graffiti ideas, rehearse the motion several times with the light switched off. The path needs consistent spacing and a clear beginning and end.
If you want more than one light color, assign each to one shape or zone rather than mixing them randomly. North-facing daylight leaks read cooler and grayer; south-facing leaks read warmer, so fully block windows when you need consistent trail color.
When do these ideas not work well at home?
They do not work well when the room is too tight to move safely, when uncontrolled light cannot be blocked, or when children or pets can enter the dark set without warning. A clever photograph is not worth tripping over a tripod, backing into a table, or swinging a light near someone who cannot see it coming.
Some effects also look better in a single photograph than they do as a practical room setup. Dense spirals, repeated bars, and large air-written shapes often need several feet of empty space behind the subject; in a furnished 9 x 10 ft bedroom they can become cramped, uneven, and full of accidental reflections. Phone flashlights are fine for testing, but they are awkward for precise long sweeps because the screen and body are harder to control one-handed.
If you cannot darken the room without taping over fixtures, blocking a shared exit, or making permanent changes in a rental, choose a simpler object study instead. The best result is the one you can repeat safely without forcing the room to behave like a studio it is not.
Frequently asked questions
Can you do light painting with a phone camera?
Yes, if the phone offers a long-exposure or manual mode and can stay completely still on a tripod or secure mount. The main limitation is control: many phones apply automatic processing that can brighten the room and weaken the contrast of the trail.
Do you need complete darkness for light painting?
No, but the darker the set, the easier it is to keep the moving light as the brightest element. Small leaks from a hallway, window edge, or screen can still appear during a long exposure, so test the empty room first.
Can one person make the light trail and take the photo?
Yes. Use a self-timer or remote release, stand at the planned starting point, and keep the movement route clear before the exposure begins. Rehearsing the path matters more when you are working alone because nobody is watching your clearance around the tripod and furniture.
Why is the person holding the light sometimes visible?
The person can appear if stray light falls on clothing or skin, or if they remain still in one place for too long. Keep moving, wear non-reflective clothing, and aim the light away from your body except where you intentionally want illumination.
How many shapes should you try in one exposure?
Start with one main shape and add a second only after the first can be repeated cleanly. Too many movements make spacing harder to control and usually create a confused frame rather than a stronger one.
Good light painting at home is mostly about control: a repeatable path, a clear floor, a stable camera, and less stray light than you think you can get away with. Start with one simple shape, make it clean, then add complexity only when the room and exposure can support it.